In the previous article, you learned how to connect your server using ssh with the PEM key. In this article, we will show you how you can use the same SSH key, PEM file to securely transfer files using SFTP.
SFTP(Secure File Transfer Protocol), also known as the SSH File Transfer Protocol. It is a secure way to transfer files between your local system and remote server. It is more secure than FTP protocol and supports all the features of FTP. Not only that, but it runs over the SSH protocol, Hence using the same SSH port 22 by default.
SFTP via command line (Linux/Mac)
You need to set PEM file permission before you use SFTP in the command line.
Run the following command to check file permissions:
ls -la demo.pemOutput:
[root@rockylinux-8 ~]# ll demo.pem
-rw-r--r-- 1 root root 1700 Dec 12 13:45 demo.pem
We need to change PEM file permissions to 400, to do so run the following command in terminal:
chmod 400 demo.pem
ls -la demo.pem
Output:
[root@rockylinux-8 ~]# chmod 400 demo.pem
[root@rockylinux-8 ~]# ll demo.pem
-r-------- 1 root root 1700 Dec 12 13:45 demo.pem
Now, connect to your remote server:
Syntax:
sftp -i your_PrivateKey.pem <user>@<public ip>The following command will show you how to connect via SFTP.
sftp -i demo.pem ubuntu@34.238.250.210Shell
Note: replace your server IP and PEM key in the above command:
Output:
[root@rockylinux-8 ~]# sftp -i demo.pem ubuntu@34.238.250.210
Connected to ubuntu@34.238.250.210.
How to Transfer Files Using SFTP command
Next, We will show you basic commands to transfer files to the remote server using the SFTP command.
1. Help command
Type the following command to get help at the command prompt. This command will show you a list of all the available commands for SFTP.
sftp> ?Or
sftp> helpOutput:
sftp> help
Available commands:
bye                    Quit sftp
cd path                Change remote directory to 'path'
chgrp [-h] grp path    Change group of file 'path' to 'grp'
chmod [-h] mode path   Change permissions of file 'path' to 'mode'
chown [-h] own path    Change owner of file 'path' to 'own'
df [-hi] [path]        Display statistics for current directory or
                       filesystem containing 'path'
2. Check Present Working Directory
File-path is very useful for upload or downloading files/directories between the local system and remote system.
To know, Local present working directory, run 'lpwd' command and run 'pwd' command to know the Remote working directory.
sftp> lpwd
Local working directory: /root
sftp> pwd
Remote working directory: /home/ubuntu
lpwd - Print the current directory on your system
pwd - Print the current directory on the remote server
3. Listing Files
# List the remote directories
lsOutput:
sftp> ls
hello_world
# List local directories
llsOutput:
sftp> lls
demo.pem  localfile_example.txt  original-ks.cfg
4. Upload Files
Using the 'put' command, you can upload a file to the remote directory.
sftp> put localfile_example.txtOutput:
sftp> put localfile_example.txt
Uploading localfile_example.txt to /home/ubuntu/localfile_example.txt
localfile_example.txt
     100% 0  0.0KB/s   00:00
You can use a wildcard before the file name to upload multiple files at the same time.
sftp> put *.txtOutput:
sftp> put *.txt
Uploading localfile_example.txt to /home/ubuntu/localfile_example.txt
localfile_example.txt
     100% 0  0.0KB/s   00:00
Uploading localfile_example1.txt to /home/ubuntu/localfile_example1.txt
localfile_example1.txt
     100% 0  0.0KB/s   00:00
Uploading localfile_example2.txt to /home/ubuntu/localfile_example2.txt
localfile_example2.txt
     100% 0  0.0KB/s   00:00
Uploading localfile_example3.txt to /home/ubuntu/localfile_example3.txt
localfile_example3.txt
     100% 0  0.0KB/s   00:00
You can resume file download also by using 'reput' command:
sftp> reput demo.mp4Output:
sftp> put demo.mp4
Uploading demo.mp4 to /home/ubuntu/demo.mp4
demo.mp4
     70%  134MB  49.2MB/s   00:01 ETA^Interrupt
demo.mp4
     71%  136MB  49.0MB/s   00:01 ETA
sftp>
sftp> reput demo.mp4
Resuming upload of demo.mp4 to /home/ubuntu/demo.mp4
demo.mp4
     100%  191MB  58.7MB/s   00:00
You can upload a local directory as well:
sftp> put -r test5. Download file from remote directory
get – command used to download files from the remote server to your local system.
For getting a single file in a local system.
sftp> get remotefile_example1.txtFor multiple files.
sftp> get remotefile_*.txtCommand sequence:
sftp> ls
hello_world localfile_example.txt localfile_example1.txt  localfile_example2.txt localfile_example3.txt  remotefile_example1.txt remotefile_example2.txt remotefile_example3.txt remotefile_example4.txt
sftp>
sftp> lls
demo.pem localfile_example1.txt localfile_example2.txt  localfile_example3.txt localfile_example.txt original-ks.cfg
sftp>
sftp> get remotefile_example1.txt
Fetching /home/ubuntu/remotefile_example1.txt to remotefile_example1.txt
sftp> lls
demo.pem localfile_example1.txt localfile_example2.txt  localfile_example3.txt localfile_example.txt original-ks.cfg  remotefile_example1.txt
sftp>
sftp> get remotefile_*.txt
Fetching /home/ubuntu/remotefile_example1.txt to remotefile_example1.txt
Fetching /home/ubuntu/remotefile_example2.txt to remotefile_example2.txt
Fetching /home/ubuntu/remotefile_example3.txt to remotefile_example3.txt
Fetching /home/ubuntu/remotefile_example4.txt to remotefile_example4.txt
If a file transfer fails, then you can resume it using the 'reget' command.
sftp> reget example.tar.gz6. Change directory
You may need to switch from one directory to another directory in local and remote locations for file operations.
# Change remote directory
cd# Change local directory
lcdBelow commands gives you a clear understanding.
Output:
sftp> pwd
Remote working directory: /home/ubuntu
sftp> cd remote_directory/
sftp>
sftp> pwd
Remote working directory: /home/ubuntu/remote_directory
sftp>
sftp> lpwd
Local working directory: /root
sftp> lcd /root/local_directory/
sftp> lpwd
Local working directory: /root/local_directory
sftp>
7. Create Directories
You can create remote directories without logging into the remote server using the following command:
mkdir testlmkdir test1
Output:
sftp> mkdir test
sftp> lmkdir test1
sftp> ls
test
sftp> lls
test1
8. Exit
Next, type '!' or 'exit' command to leave the SFTP server.
sftp> !
[root@rockylinux-8 ~]#
SFTP using FileZilla (Windows/Linux/Mac)
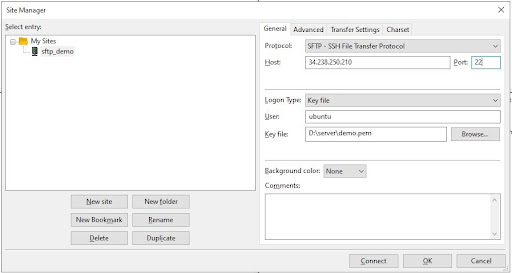
If you are not comfortable with the command prompts then no issue, you can use FileZilla to manage file operations easily between two network nodes.
- Open FileZilla and go to 'File' option.
- Click on 'Site Manager' and enter details.
- Select Protocol: SFTP – SSH File Transfer Protocol
- Host: your_server IP/ Domain name
- Port: your server ssh port
- Logon Type: Key file, User: your_server_username
- Key file: Browse your server pem file

Find your PEM file

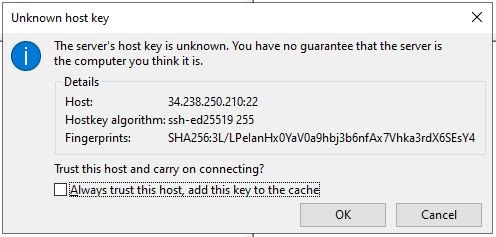
Unknown host key

SFTP connect
SFTP using WinSCP (Windows)
You can connect with SFTP using 'WinSCP'another popular GUI tool available for Windows.
Open WinSCP → 'Session' → 'New Session'
Then, fill in the following details:
- File protocol: Select SFTP
- Host name: your server IP
- Port number: your server ssh port
- User name: your_server_username
- Password: Do not enter any password

WinSCP → Session → New Session
Click on 'Advanced' ⇾ 'Authentication'

WinSCP authentication
Then select your PPKfile.ppk file, or select the PrivateKey.pem that you created earlier.
If you select the PEM file, then a dialog will appear, Click Ok.

Convert this OpenSSH private key to PuTTY format
Next, save and select that .ppk file.

Select ppk file
Click on the ‘OK’ button:

Private key was converted and saved
Next, click on the ‘yes’ button:

WARNING: Continue connecting to an unknown server
You are now connected with your remote server via SFTP using WinSCP.

WinSCP + SFTP browse list of files
Congratulations! Now you know how to connect to SFTP using a PEM file and how to use SFTP from the command line and from GUI tools for easy data transfer from the local system to the remote server.
If you need more info, Join our community discord channel, get help and free consultation!
If you need a quick help from the Linux expert, book the service from here

